How to Start Making Videos on a Budget: A No-Fluff Quick Guide
So, you’re ready to start making videos? That’s awesome! But if you’ve spent any time online, you’ve probably seen setups with thousand-dollar cameras and complex lighting rigs. It’s enough to make anyone hesitate.
You don’t need fancy gear to start. In fact, some of the most successful creators began with the bare essentials. The real magic is in the information you’re providing and a few simple, budget-friendly techniques.
I’ve broken down the entire process into a simple, step-by-step guide to get you from zero to published, without breaking the bank.
1. What You Actually Need to Start
Forget the overwhelm. If you’re starting from zero, focus on these three things:
-
Audio: A basic lavalier mic or USB microphone.
-
Lighting: One small, affordable LED panel or a brightly lit window.
-
Stability: A simple phone mount and tripod.
Everything else is a “nice-to-have” and can be improved upon over time. Remember, compelling information and confident delivery will always beat fancy gear you don’t know how to use yet or may delay you putting out content.
2. Audio First: Why Clear Sound is Non-Negotiable
Your audience will forgive mediocre video quality, but they will click away from bad audio in seconds.
Your brain processes clean audio as professional, even if the video isn’t 4K. Here’s how to get it right on any budget.
Microphone Options:
-
Budget Lavalier: A wired or wireless lav mic (like from Boya or Comica) that clips to your shirt is the single best upgrade for on-camera sound when recording on your phone or camera.
- You may need a phone attachment to plugin your microphone to your phone like a “USB C to 3.5mm Headphone Jack Adapter”
-
Step-Up Wireless: The RØDE Wireless Go is a popular and reliable choice for more freedom of movement.
-
Desktop USB Mic: For voiceovers or desk-based recording, a Blue Yeti is a classic for a reason, it’s plug-and-play easy.
Quick Recording Tips for Pro Sound:
-
Find a Quiet Space: Turn off fans, AC, and noisy appliances.
-
Do a Sound Check: Always record a 10-second test to listen for any hums or buzzes.
-
Watch Your Levels: Record so your audio meter peaks in the yellow/green, not the red. Red means distortion.
The Bottom Line: If you can only afford one upgrade, make it your microphone.
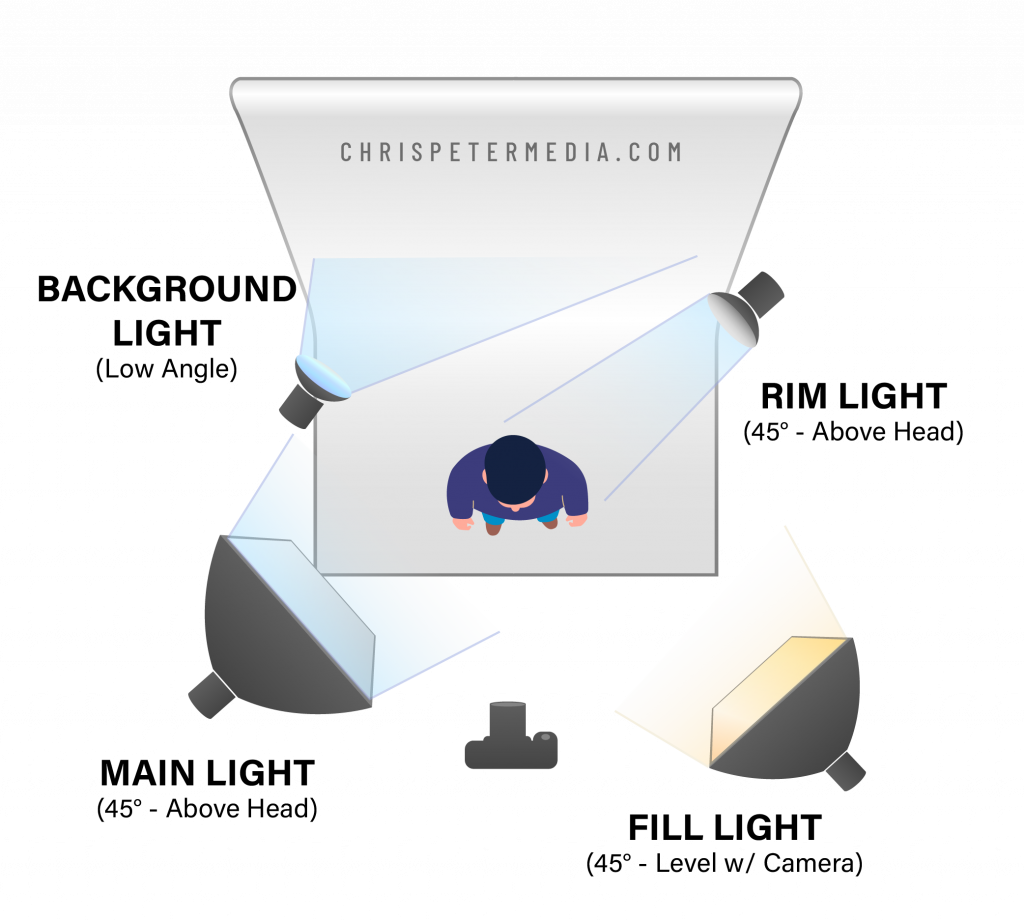
3. Lighting Basics That Make You Look Pro
You don’t need a Hollywood studio. You just need to understand one concept: soft, directional light.
-
The One-Light Wonder: If you’re on the go, a small led panel on a phone attachment, or a larger main led panel (or simply sit next to a bright window) slightly to the side and above your eye level. This creates nice dimension on your face.
-
Level Up Your Setup:
-
Add a Fill: Place a dimmer light (or a piece of white poster board) on the opposite side to soften shadows.
-
Add a Hair/Rim Light: A small light behind you, pointing at the back of your head, helps separate you from the background.
-
Style Pop: A small, colored accent light aimed at your background adds instant depth and style.
-
4. Stability: Stop the Shake
Shaky video is distracting and screams “amateur.” The fix is cheap and simple.
-
Use a Tripod: A basic tripod with a phone clamp is all you need.
-
Desk Mounting: For webcams or a phone on your desk, a flexible desk arm gives you perfect, stable framing.
-
Framing Tip: Keep your camera lens slightly above your eye level for a universally flattering angle.
5. Phone vs. Camera: The Honest Truth
Start with your phone. The camera in your pocket is more powerful than professional cameras from a decade ago. It’s convenient and the quality is excellent.
When should you upgrade to a dedicated camera? Only when you need specific features like interchangeable lenses or more manual control. A great entry-level option is the Sony ZV-1F. And in the future when you did get a high-end camera you can use the Sony ZV-1F as you’re new webcam! Upgrade when your workflow demands it, not because you think you should.
6. A Simple Desk Recording Setup for Consistency
This is my personal “get it done” rig. Having a permanent(ish) setup means you can hit record in seconds, which is a game-changer for consistency and convenience.
-
Lighting: Two desk mounted LEDs for key and fill light, plus one behind me for a hair light.
-
Camera: A webcam on an adjustable arm, so framing is always perfect. The OBSBOT Meet 2 is a great starter!
-
The Finishing Touch: A small, colored LED light on the background to make it pop.
7. A Recording Workflow That Saves Time
Stop rambling and start recording efficiently.
-
Plan Lightly: You don’t always have to script every word. A bullet-point outline keeps you natural but on track.
-
Record in Short Bursts: It’s easier to sound energetic and makes editing a breeze. Don’t be afraid to do multiple takes and take it one section at a time.
-
Trim Later: Your first edit should be cutting out long pauses, “ums,” and “ahs.”
-
Stay Organized: Use clear folders and file names with dates (e.g.,
Tutorial_A-Roll_20231027). Future you will be grateful.
8. Editing Tools: From Phone to Desktop
On Your Phone (Great for Shorts/Reels):
-
CapCut, KineMaster Pro, iMovie: Perfect for trimming clips, adjusting brightness, and basic audio leveling.
On Your Desktop (More Power & Control):
-
Adobe Premiere Pro: The industry standard. Total control over everything.
-
OBS Studio: A fantastic free tool for recording your screen or live streaming.
-
Camtasia: Brilliant for tutorial makers, with easy cursor effects and callouts.
Staying Organized is a Superpower: Before you start, create folders for: Project Files, Footage, B-roll, Music, Graphics, and Exports. This simple habit will make it easier to revisit your projects and make additional cuts or versions.
9. Editing Techniques That Keep People Watching
-
Cut Tight: Try to remove every long pause, stumble, and even breaths between sentences.
-
New Visuals Every 3-5 Seconds: Use B-roll, pop-up text, a quick zoom-in, or a cutaway. This keeps the brain engaged.
-
Basic Color Correction: In Premiere Pro, use an Adjustment Layer to set your white balance, tweak exposure, and add a little contrast.
-
Level Your Audio: Make sure your voice is loud and clear. Use a “Hard Limiter” effect to prevent any loud peaks from distorting.
10. B-roll, Music, and Licensing 101
B-roll (supplemental footage) makes your videos more engaging, saves you from having to film everything, and supports your story.
Don’t have your own B-roll? Use stock libraries:
-
Storyblocks, Envato Elements: These subscription services offer unlimited downloads of music, B-roll, graphics, and sound effects.
Music Tips:
-
Keep it Low: Background music should sit under your voice, never competing with it.
-
License Smartly: Never use popular music without a license unless you’re adding it on the social app. Using in-app music on social platforms can sometimes help with discovery.
11. Captions: Don’t Skip This Step
Captions are essential for accessibility, comprehension, and watch time, especially for the 80%+ of people who watch video on mute. You don’t always need it for long form versions like on YouTube since it has auto captioning, but always try to add to your short form videos.
-
Tools: Use Opus Clip for auto-generated, stylized captions, or your platform’s built-in tools for clean subtitles.
-
YouTube Pro Tip: Upload an SRT file for maximum accuracy. You can create these from your script or export from Premiere Pro.
-
Legibility First: Fancy fonts are fun, but clarity is better. Make sure to watch your video with no sound and see if you can follow along.
12. Repurpose Your Work for Maximum Reach
Don’t let your hard work live and die in one place. Use the Pillar Content Method.
-
Record one long-form video (your “pillar”).
-
Chop it up into 3-5 short, vertical clips for TikTok, Reels, and Shorts.
-
Turn your script into a blog post (hey, that’s what I’m doing now!) and embed the video.
-
Batch your work: Film multiple videos at once, then edit them later. This saves a massive amount of time and helps with planning.
Scheduling & Analytics:
Use a tool like Metricool to schedule posts across all platforms and, most importantly, to see what’s working. After about 10 videos, look at your analytics. Where do people drop off? What topics perform best? Let data guide your next move.
Your Quick-Start Checklist
Feeling overwhelmed? Just follow this list.
Gear to Gather:
-
Your Smartphone
-
Lavalier Mic (wired or wireless) OR USB Mic Blue Yeti
-
One LED Panel or a Window
-
Tripod & Phone Clamp
Before You Record:
-
Find a quiet room (fans/AC off!)
-
Do a 10-second audio test
-
Frame your shot (lens at or above eye level)
While Editing:
-
Organize files into folders
-
Trim all pauses and mistakes
-
Add B-roll or a new visual every few seconds
-
Do basic color correction
-
Level your audio and limit peaks
When Publishing:
-
Add accurate captions
-
Write a compelling title & description
-
Create 3-5 short clips from the main video
-
Schedule your posts and review analytics later
Frequently Asked Questions (FAQ)
Q: Do I really need a camera to start?
A: No. Your phone is more than enough. Upgrade only when you hit a technical limitation that your phone can’t solve.
Q: What’s the first thing I should buy on a small budget?
A: A microphone. 100%. Good audio provides the biggest perceived jump in quality.
Q: Which editing app is best for a total beginner?
A: On your phone, start with CapCut. On desktop, Premiere Pro has a learning curve but is the most powerful. Choose the one you’ll actually use consistently.
Q: How long should my videos be?
A: As long as they need to be valuable. For short-form content, keep it under 60 seconds. For tutorials, let the lesson dictate the length, be thorough but concise. A good length for long form videos for YouTube are usually about 7-20mins.
Progress will always beat perfection. Your first video won’t be perfect, and that’s okay. The goal is to start, learn, and improve with each upload. Focus on providing value, and the audience will come.
Now stop reading and go make something!